ChromeSafariBrowser
Supported Platforms: AndroidiOS
The ChromeSafariBrowser class represents Chrome Custom Tabs on Android and SFSafariViewController on iOS.
Basic Usage
If you want to use the ChromeSafariBrowser class on Android 11+, then you need to specify your app querying for android.support.customtabs.action.CustomTabsService
in your AndroidManifest.xml (you can read more about it here).
To be able to listen to the ChromeSafariBrowser events, you need to create a class that extends the ChromeSafariBrowser class in order to override the method callbacks.
Example:
import 'package:flutter/foundation.dart';
import 'package:flutter/material.dart';
import 'package:flutter_inappwebview/flutter_inappwebview.dart';
class MyChromeSafariBrowser extends ChromeSafariBrowser {
void onOpened() {
print("ChromeSafari browser opened");
}
void onCompletedInitialLoad(didLoadSuccessfully) {
print("ChromeSafari browser initial load completed");
}
void onClosed() {
print("ChromeSafari browser closed");
}
}
Future main() async {
WidgetsFlutterBinding.ensureInitialized();
if (!kIsWeb && defaultTargetPlatform == TargetPlatform.android) {
await InAppWebViewController.setWebContentsDebuggingEnabled(kDebugMode);
}
runApp(const MaterialApp(home: MyApp()));
}
class MyApp extends StatefulWidget {
const MyApp({super.key});
State<MyApp> createState() => _MyAppState();
}
class _MyAppState extends State<MyApp> {
final browser = MyChromeSafariBrowser();
void initState() {
browser.addMenuItem(ChromeSafariBrowserMenuItem(
id: 1,
label: 'Custom item menu 1',
onClick: (url, title) {
print('Custom item menu 1 clicked!');
}));
super.initState();
}
Widget build(BuildContext context) {
return Scaffold(
appBar: AppBar(
title: const Text('ChromeSafariBrowser Example'),
),
body: Center(
child: ElevatedButton(
onPressed: () async {
await browser.open(
url: WebUri("https://flutter.dev/"),
settings: ChromeSafariBrowserSettings(
shareState: CustomTabsShareState.SHARE_STATE_OFF,
barCollapsingEnabled: true));
},
child: const Text("Open Chrome Safari Browser")),
),
);
}
}
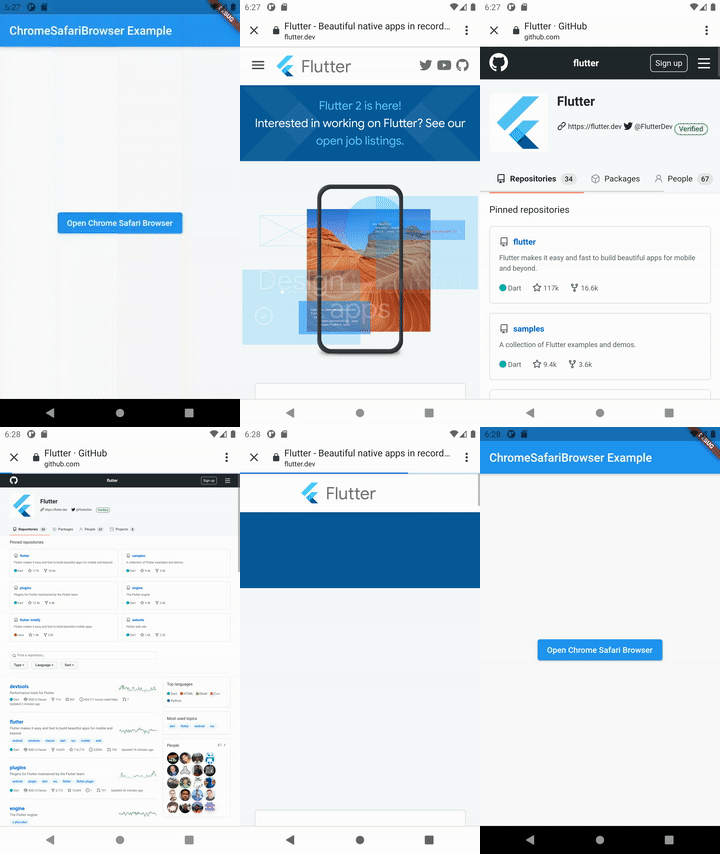
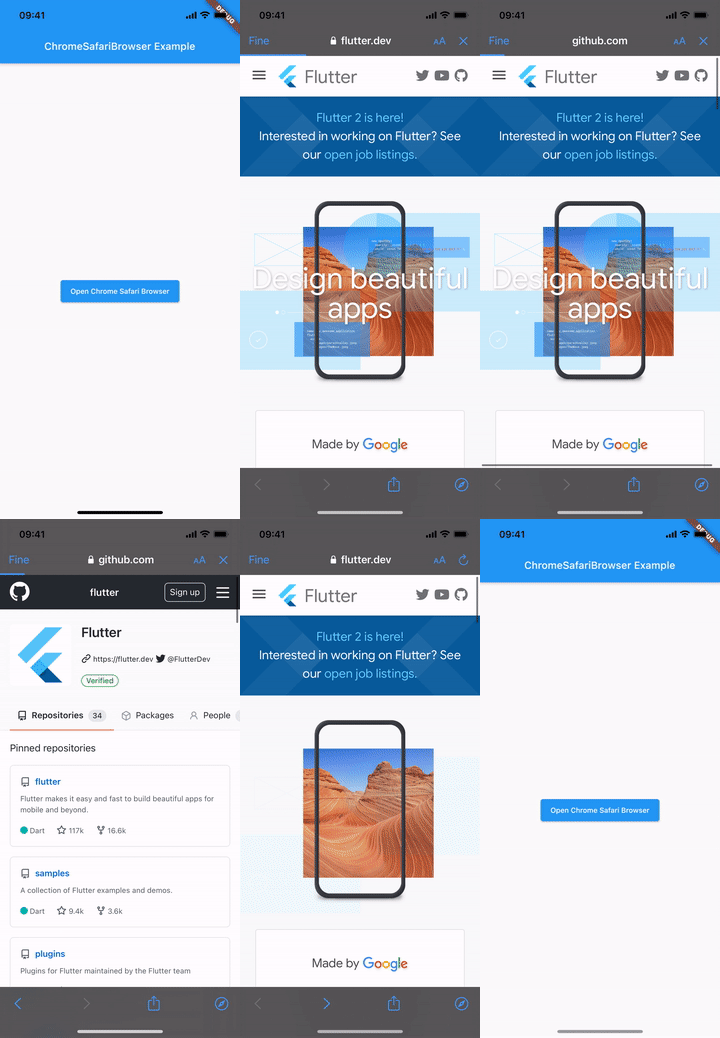
This is the result:
- Android
- iOS


Style and Animations
Android and iOS behaves differently regarding browser style and entrance and exit animations.
Android
Use the "color" related ChromeSafariBrowserSettings properties to change the color of the specific portion of the browser.
You can change the Custom Tabs entrance and exit (when the user presses Back) animations
using ChromeSafariBrowserSettings.startAnimations and ChromeSafariBrowserSettings.exitAnimations.
Both of these properties accept a list of 2 AndroidResource instances that represent the "enter" and "exit" animation
for the browser and the application.
AndroidResource is a class that represents an Android resource file.
A list of available android.R.anim can be found
here.
A list of available androidx.appcompat.R.anim can be found
here
(abc_*.xml files).
To define your custom Android resource animation, check the Official Android Animation Docs.
iOS
Use ChromeSafariBrowserSettings.presentationStyle to set the custom modal presentation style when presenting the WebView.
If you need to change the transition style when presenting the Browser, use ChromeSafariBrowserSettings.transitionStyle
Example:
ChromeSafariBrowserSettings(
  // Android
  startAnimations: [
    AndroidResource.anim(
        name: "slide_in_left", defPackage: "android"), // android.R.anim.slide_in_left
    AndroidResource.anim(
        name: "slide_out_right", defPackage: "android") // android.R.anim.slide_out_right
  ],
  exitAnimations: [
    AndroidResource.anim(
        name: "abc_slide_in_top", // androidx.appcompat.R.anim.abc_slide_in_top
        defPackage:
            "com.your_android.application_id"),
    AndroidResource.anim(
        name: "abc_slide_out_top", // androidx.appcompat.R.anim.abc_slide_out_top
        defPackage: "com.your_android.application_id")
  ],

  // iOS
  presentationStyle: ModalPresentationStyle.OVER_FULL_SCREEN,
  transitionStyle: ModalTransitionStyle.PARTIAL_CURL
)
Action and Activity button
Android
On Android, you can add a custom Action button to be displayed on the top toolbar and listen to the click event
using the ChromeSafariBrowser.setActionButton method.
Example:
var actionButtonIcon = await rootBundle.load('assets/images/action-button.png');
chromeSafariBrowser.setActionButton(ChromeSafariBrowserActionButton(
  id: 1,
  description: 'Action Button description',
  icon: actionButtonIcon.buffer.asUint8List(),
  onClick: (url, title) {})
);
To update the icon and description of it at runtime, use the ChromeSafariBrowser.updateActionButton method.
iOS
On iOS, you can add an Activity button to be displayed on the bottom toolbar using the ChromeSafariBrowserSettings.activityButton property.
When tapped, it will invoke a Share or Action Extension bundled with your app.
Check Official Apple App Extensions for more details.
Example:
ChromeSafariBrowserSettings(
  activityButton: ActivityButton(
    templateImage: UIImage(systemName: "sun.max"),
    extensionIdentifier: "com.your.ios_bundle_identifier.extension_identifier"
  )
)
UIImage is a class that represents an object that manages iOS image data in your app.
Check UIKit.UIImage for more details.
Android Secondary Toolbar
On Android, you can also add a custom secondary toolbar at the bottom using an Android layout resource file and listen for click events on specific view elements using Android IDs.
Create your custom Android layout resource and define the clickable IDs,
for example add a file in android/app/src/main/res/layout/remote_view.xml with this code:
<?xml version="1.0" encoding="utf-8"?>
<LinearLayout xmlns:android="http://schemas.android.com/apk/res/android"
    android:layout_width="match_parent"
    android:layout_height="wrap_content"
    android:background="@android:color/white"
    android:orientation="horizontal">

    <Button
        android:id="@+id/button1"
        android:layout_width="wrap_content"
        android:layout_height="wrap_content"
        android:text="Button 1" />

    <Button
        android:id="@+id/button2"
        android:layout_width="0dp"
        android:layout_height="wrap_content"
        android:layout_weight="1"
        android:text="Button 2" />

</LinearLayout>
where the clickable IDs are button1 for the first button and button2 for the second button.
Then, add the secondary toolbar using the ChromeSafariBrowser.setSecondaryToolbar method, for example:
chromeSafariBrowser.setSecondaryToolbar(
  ChromeSafariBrowserSecondaryToolbar(
    layout: AndroidResource.layout( // matches the "android/app/src/main/res/layout/remote_view.xml" file
        name: "remote_view",
        defPackage:
            "com.your_android.application_id"),
    clickableIDs: [
      ChromeSafariBrowserSecondaryToolbarClickableID(
          id: AndroidResource.id(
              name: "button1", // ID of the first button
              defPackage:
                  "com.your_android.application_id"),
          onClick: (WebUri? url) {
            print("Button 1 with $url");
          }),
      ChromeSafariBrowserSecondaryToolbarClickableID(
          id: AndroidResource.id(
              name: "button2", // ID of the second button
              defPackage:
                  "com.your_android.application_id"),
          onClick: (WebUri? url) {
            print("Button 2 with $url");
          }),
    ]
  )
);
To update it, you can use the ChromeSafariBrowser.updateSecondaryToolbar method.
Android Extra Headers and Referrer
On Android, you can add extra headers and a referrer header when launching your Custom Tab.
To add a referrer, use the referrer argument of the ChromeSafariBrowser.open and ChromeSafariBrowser.launchUrl methods.
Instead, use the headers argument to add extra headers with the request.
Extra Headers
HTTP requests contain headers such as User-Agent or Content-Type.
Apart from headers attached by browsers, Android apps may add extra headers, like Cookie or Referrer through the headers argument.
For security reasons, Chrome filters some of the extra headers depending on how and where an intent is launched.
Until Chrome 83, developers could add any headers when launching a Custom Tab. From version 83 onward, Chrome started filtering all except approvelisted cross-origin headers, since non-approvelisted headers posed a security risk. Starting with Chrome 86, it is possible to attach non-approvelisted headers to cross-origin requests, when the server and client are related using a digital asset link.
Example of approvelisted headers are: accept-language, content-language, content-type.
Examples of non-approvelisted headers are: bearer-token, origin, cookie.
We can always attach approvelisted headers to Custom Tabs CORS requests. However, Chrome filters non-approvelisted headers by default. Although other browsers may have different behaviour, developers should expect non-approvelisted headers to be blocked in general.
The supported way of including non-approvelisted headers in custom tabs is to first verify the cross-origin connection using a digital access link.
Adding non-approvelisted Extra Headers
Set up digital asset links
To allow non-approvelisted headers to be passed through custom tab intents, it is necessary to set up a digital asset link between the android and web application that verifies that the author owns both applications.
Follow the official guide to set up a digital asset link. For the link relation use "delegate_permission/common.use_as_origin"
which indicates that both apps belong to the same origin once the link is verified.
Set up a Custom Tabs Connection to Validate the Asset Link and launch the intent
A Custom Tabs connection is used for setting up a Custom Tabs session between the app and the Chrome tab. We need the session to verify that the app and web app belong to the same origin. The verification only passes if the digital asset links were set up correctly.
class MyChromeSafariBrowser extends ChromeSafariBrowser {
void onServiceConnected() async {
// Validate the session as the same origin to allow cross origin headers.
await validateRelationship(relation: CustomTabsRelationType.USE_AS_ORIGIN,
origin: WebUri("https://flutter.dev"));
}
void onRelationshipValidationResult(
CustomTabsRelationType? relation, Uri? requestedOrigin, bool result) async {
// Launch Custom Tabs with non-approvelisted Extra Headers
// after session was validated as the same origin.
await launchUrl(url: WebUri("https://flutter.dev"), headers: {
'bearer-token': 'Some token',
'redirect-url': 'Some redirect url'
});
}
}
// ...
final chromeSafariBrowser = MyChromeSafariBrowser();
chromeSafariBrowser.open();
Android TWA
To create an App for Android that supports TWA (Trusted Web Activity), you can use the ChromeSafariBrowser class with the Android-specific option isTrustedWebActivity: true.
Remove the URL bar
Trusted Web Activities require an association between the Android application and the website to be established to remove the URL bar.
This association is created via Digital Asset Links and the association must be established in both ways, linking from the app to the website and from the website to the app.
It is possible to setup the app to website validation and setup Chrome to skip the website to app validation, for debugging purposes.
Check the official Android Integration Guide for more details.
TWA Example
import 'package:flutter/foundation.dart';
import 'package:flutter/material.dart';
import 'package:flutter_inappwebview/flutter_inappwebview.dart';
class AndroidTWABrowser extends ChromeSafariBrowser {
void onOpened() {
print("Android TWA browser opened");
}
void onCompletedInitialLoad(didLoadSuccessfully) {
print("Android TWA browser initial load completed");
}
void onClosed() {
print("Android TWA browser closed");
}
}
Future main() async {
WidgetsFlutterBinding.ensureInitialized();
if (!kIsWeb && defaultTargetPlatform == TargetPlatform.android) {
await InAppWebViewController.setWebContentsDebuggingEnabled(true);
}
runApp(MaterialApp(home: MyApp()));
}
class MyApp extends StatefulWidget {
final ChromeSafariBrowser browser = new AndroidTWABrowser();
_MyAppState createState() => new _MyAppState();
}
class _MyAppState extends State<MyApp> {
void initState() {
super.initState();
}
Widget build(BuildContext context) {
return Scaffold(
appBar: AppBar(
title: const Text('Android TWA Example'),
),
body: Center(
child: ElevatedButton(
onPressed: () async {
await widget.browser.open(
url: WebUri("https://flutter.dev/"),
settings:
ChromeSafariBrowserSettings(isTrustedWebActivity: true),
);
},
child: Text("Open Android TWA Browser")),
),
);
}
}
Create the Android string resource file android/app/src/main/res/values/strings.xml and add the Digital AssetLinks statement below for the https://flutter.dev/ website:
<resources>
    <string name="app_name">Flutter Trusted Web Activity</string>
    <string name="asset_statements">
        [{
            \"relation\": [\"delegate_permission/common.handle_all_urls\"],
            \"target\": {
                \"namespace\": \"web\",
                \"site\": \"https://flutter.dev\"}
        }]
    </string>
</resources>
In the Android App Manifest file android/app/src/main/AndroidManifest.xml, link to the statement by adding a new meta-data tag as a child of the application tag:
<application
    android:label="flutter_inappwebview_example"
    android:icon="@mipmap/ic_launcher">
    <!-- ... -->
    <meta-data
        android:name="asset_statements"
        android:resource="@string/asset_statements" />
    <!-- ... -->
    <activity>
        <!-- ... -->
    </activity>
</application>
To enable debug mode:
- Open Chrome on the development device, navigate to
chrome://flags, search for an item called Enable command line on non-rooted devices and change it toENABLEDand then restart the browser. - Next, on the Terminal application of your operating system, use the Android Debug Bridge (installed with Android Studio), and run the following command:
adb shell "echo '_ --disable-digital-asset-link-verification-for-url=\"https://flutter.dev\"' > /data/local/tmp/chrome-command-line"
Close Chrome and re-launch your application from Android Studio. The application should now be shown in full-screen.
Note: It may needed to force close Chrome so it restarts with the correct command line. Go to Android Settings > Apps & notifications > Chrome, and click on Force stop.
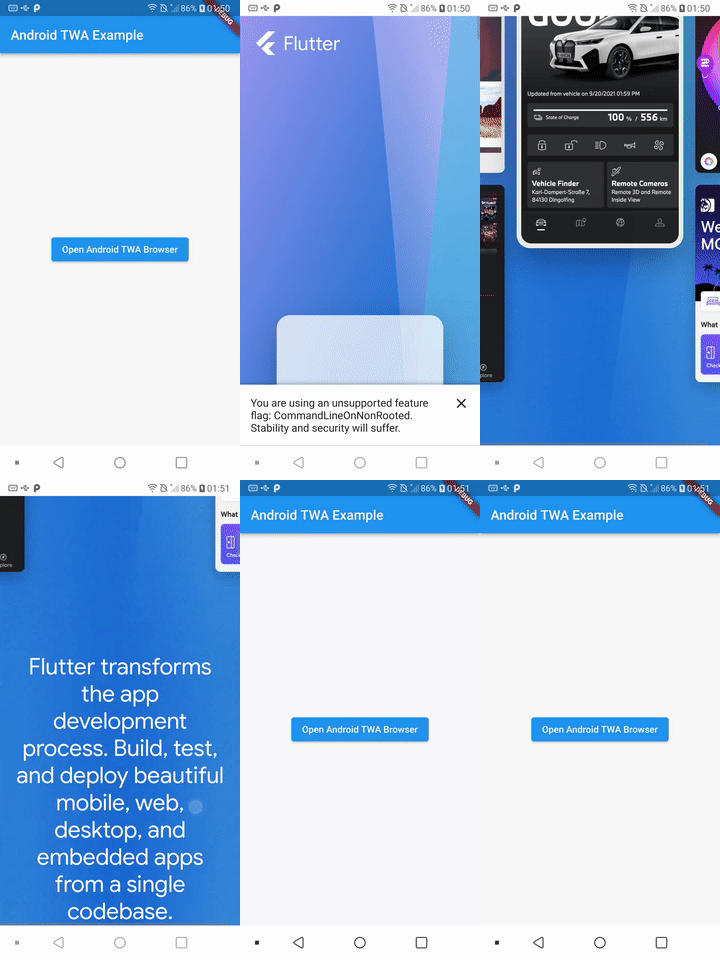
This is the result:
- Android

Did you find it useful? Consider making a donation to support this project and leave a star on GitHub 